Tuesday, February 14, 2012

YEEHAW


Car's with me now. Here's a shot of it on the trailer.


And again after a quick drive to the car wash. I'd prefer to wash it by hand, but the hose at my house is currently frozen, and I don't have all the necessary doodads. Sorry about the filter, I'm using this as the background on my phone, and didn't want to see that stupid ass truck everytime I look at my home screen.

One thing I noticed as I drove it was that it wasn't getting enough gas. I knew that this was probably residual gunk sitting in the gas tank from when it was sitting in storage. I've ordered a POR 15 gas tank restoration kit, so when it arrives, I'm going to have a fun little project.

In the meantime, I bought a bunch of fuel filters, and a can of seafoam. Keeping an eye on it. It has been pushing through the filter pretty clean lately, but I'm not going to be 100% satisfied until I have it cleaned and sealed.


Think that might be the problem? I was hesitant to install the Weber 32/36 carb I bought with the filter looking like this. After a few drives and changes, though, It's definitely clearing up.

Again, not enough for me to be 100% satisfied, but good enough for now. I have had some pretty harrowing initial drives around town in this thing though. Nothing says getting to know your car like stalling out everytime you stop, and praying to god it doesn't happen in an intersection.

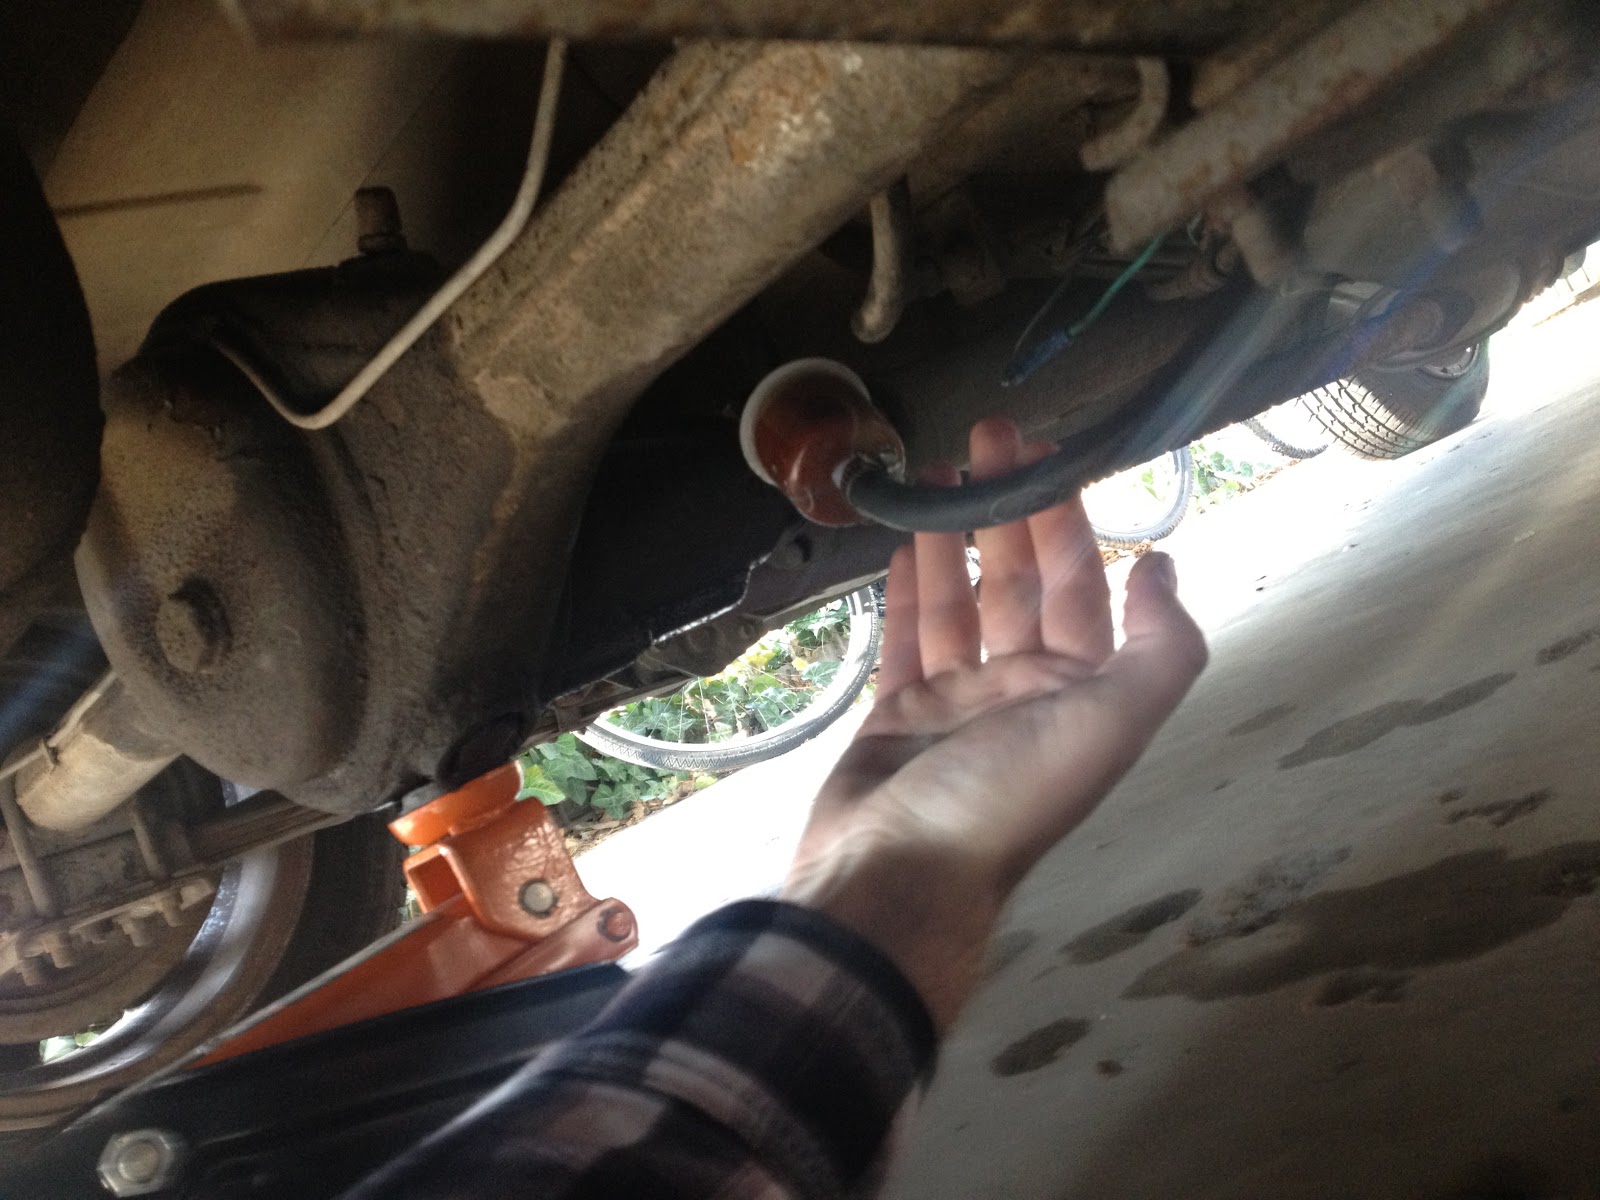
Below is what the filter looked like today when I changed it and ran it for a good 10 minutes. This is the 3rd one I've put in since the car arrived. You can see the rust dust residue on my driveway, along with various coolant stains. My roommate's VW is leaking like a seive, and for some reason she's okay with not replacing the water pump.

You can see sun (in February?!) out there, which has enabled me to work or dick around almost daily on the car. I'm only running the plastic filters until I fix the tank, so I can keep an eye on it. This car isn't going to be driven seriously without a metal filter down there.

Considering the cleanliness of the filter, and the ugliness of the stock air cleaner, and the weak performance of the almost 40 year old stock carb, I decided to go ahead and install the Weber. I got the kit new from Weber Carbs direct.

Pulling the old one off wasn't too hard, nor was installing the new one. I had a bit of trouble figuring out the base adaptor configuration, and I had to retrofit the old throttle linkage attachment to the new carb, but other than that, it went off pretty much without a hitch. Not too shabby for a first-timer. One last problem I ran into was that my fuel pump does run at 4.5 PSI and Weber requests 3.5 PSI for proper performance. I got a cheapo fuel pressure regulator, but when I was trying to get the engine started, there was no fuel going to the damn thing!

I pulled the worthless regulator (Mr. Gasket Co., so you know) off, and boom, the car started right up, albeit running rather rich. I'll have to pick up a better regulator as soon as I can find one. I adjusted the richness, and got a pretty smooth idle, although it still doesn't like to drive up hills. And it sometimes will idle reallllly low. My tach doesn't work at the moment, but it certainly sound like less than 500 rpm at times. These are all issues I plan on addressing this week. There is a little Cars and Coffee get together this weekend for a bunch of local J-Tinners, and I'd really like to make a solid debut.


There she is with the new setup, and a shot in the dark when I finally finished dialing everything in. Those flourescent lights come in rather nice when the days are short as they are this time of year. I'm sure my crazy neighbor enjoyed hearing me opening it up 15 feet away from her living room, where I know she was trying to watch her TV shows.

Now, for the future plans (as soon as basic mechanics are out of the way). Swiped these off ebay. AME's are apparently super rare, as I could hardly find any information on them. These wheels were made in the early 80's in the Enkei factory, under the AME name, if my facts are correct.

 Size is 13"x7" with -6 offset all around, I believe.
I ordered up some Falken 185/60 r13's to wrap around them. Those were tricky to find, by the way. I think I'm going to wait for summer or at least late spring to install and fit them. Partially cause I don't want to dirty up these pups, but also because I want to get the fitment right, and I need to order new suspension parts still. Going to get adjustable coilovers up front and new shocks all around. I'm not sure about how to lower the leaf springs, so I think its going to be run stock, possibly opting for some lowering blocks if necessary. I need to research more options here.

Other than that, I've been spending waaaaay too much money on various things. As I mentioned last post, I am not satisfied with the Mercedes Benz taillight setup, so I started searching around.

I found a seller on the JNC forums who has 2 driveable Te27's and I guess one derelict one, because I don't know why else he'd be willing to chop the back end off. This is going to be the big bodywork project for my car, and I'm just waiting until the time is right.

Stockpiling parts is okay, but doing poor work is not. I want to make sure that I either a) have the necessary skill to pull this job off, or that b) I have someone helping me that does.

Eric @ JDM Legends is going to be a mighty valuable resource, and I am trying to start up an apprenticeship/shop bitch type situation there. Hopefully we can have a symbiotic relationship going there. I plan on spending as much time there as I can without getting in their way, while still helping as much as possible.
Here are the taillights to match. I think that trim will look nice matte black. It's kind of a rough gray right now. Maybe down the line I'll even be able to find some cool JDM taillights. You can see a big pile of parts in these two pictures, including the stock air cleaner with carb sitting under it in the box. I think the new setup looks much nicer, don't you?


Speaking of JDM, here are some non-JDM fender mirrors I got off ebay. They are Hella-Talbot, and supposedly off a Fiat Abarth 750 Double Bubble Zagato. I would have preferred OEM Toyota mirrors, but since every set I've seen is overseas and that sketches me out, these will have to do, for now at least. I think they still look pretty sweet, and only JDM snobs will be the ones to call me out. I'd love nothing more than to have a JDM Sprinter Trueno, but that's not what this car is, and I guess all I can do is either break my back trying to find super rare parts to make it that car, or just try to capture the spirit that I think this car has.

So that brings us to where we are. I'm pretty busy with moving out into a new place and midterms right about now, so no promises for updates until I can make another substantial post. Until then, adios!

Sunday, January 22, 2012

Planning Ahead

Back in SLC now, car is registered and sitting in AZ for the next couple weeks until it is towed up here. Sitting around with nothing to work on has gotten me thinking over and over the first things I plan on doing.

I ordered a Weber Downdraft carb to replace the stock unit, which should free up some ponies. Also bidding on a set of KP61 taillights on ebay, going to replace the poorly "frenched" Mercedes 500 SEL units. A bit of other body dings and holes to plug, not to mention fabbing up a front bumper. Looks like the car might have to be a matte grey demon for a while after all this work is done until I can get the interior stripped/cleaned.


 This picture is pretty indicative of the interior. I'm going to have to source a heater/blower unit from somewhere, and probably need to rebuild the dash and panel from scratch. Thinking maybe a nice mahogany...?
Front bumper shouldn't be too hard to figure out, just going to need a pipe bender. You can see the holes that need plugging, in addition to tucking various wires away. Also thinking about replacing radiator, and at the very least swapping over to electric fan ASAP.

After all that is going to come suspension, and possibly fitting some smaller (13x7's) wheels, if I can find a decent set without breaking the bank. Hopefully will be driving by March/April, weather permitting. Going to try and keep it covered as much as possible, as the weatherstripping is all pretty shot, but I am hesitant to buy a whole new set until post-paint. Wish I didn't have to repaint, but there are too many little things that will just drive me nuts if I don't address them.

So, next post will have work in progress shots, I promise!

Tuesday, December 27, 2011

The little things

Today was a relief. There have been just a few minor issues to sort out in order to get this thing ready for an inspection when registered. First, there was the major issue of getting into the engine bay. Turns out all my work for a few days crawling around on the ground had been in vain, for within 5 minutes of jacking the front end up for a better angle of attack, we had popped the latch and the hood opened.

I decided it was time to replace the old cable and handle as the old one was obviously beat.


I was just relieved to have the damn thing open. This has been a big stessor in my life for the last few days, and I want to be sure it doesn't happen again. As you can see, there was no saving this old housing. The cable itself was fine, but had too much slack in it, from extending over the years. I'm not sure why all the things that you never think about on this car are popping up, but I'm sure there will be many more like it down the road. Hopefully I will gain experience and knowledge, but I'm afraid at the moment I'm still an amateur in decoding its nuances. There is an overwhelming amount of work to be done still, but I am pledging to get it to a nicer state.


I ended up buying a hood latch cable kit from NAPA and a brake line from a local bike shop. The NAPA kit didn't come with a sheath, but I thought I might need the ball end from the bike cable, as that is what the latch mechanism takes. 

We had to take the latch off of the car to work on it. When it came off, it was covered in a nice layer of grease and sludge. I didn't take the time to grab my new iPhone out of my pocket with greasy fingers to show how dirty it was, but it was no wonder it was sticking. After a bath and scrub, I managed to get most of it down to metal. Had I steel wool, I may have done better in this effort. A couple sections had been bent, and the spring connecting the two opposite sliding ends of the mechanism had popped off during one of my previous efforts to pop the hood manually. A little bit of work with the pliers, a nice lubrication, and this is what I ended up with:


And reinstalling the refurbished system into the car. You can see in the picture on the right that we (Brock and I) abandoned the bicycle brake type fitting, and instead drilled a small hole and attached the screw down fitting that came with the NAPA kit. This was done a) because the cable I bought from the bike store had the ball end, but not the attachment on the other end of the cable for the pull handle. That is a fitting that has a handle attached. The bike cable would have worked like a dream, but without a handle, it was worthless to this system. This way, the cable is also adjustable, should it gain slack. Hopefully, this system is something I will not have to deal with again, but if I do, I want to be able to fix it without a big headache. 

Now that I have engine access again it was time to throw the air cleaner back on, and also get a tie town strap for the battery. There were the rods, but not the strap connecting the two. I also picked up a rearview mirror and installed it, but forgot to take a picture. 


The car is getting closer and closer to being at least temporarily road going. There are still a couple minor issues to sort out, but I have yet to even have a proper drive in this thing. This car deserves all the work it can get, but for the time being, we're going to have to rough it together, until I can start the teardown and rebuild. There is body work, engine work, interior work, and more to be done. I want to have a proper driver that can stand its own amongst more expensive cars when it comes to looks and form. This will inevitably become a money pit in my life, but at least I can say it will be worth it. If not for the financial gain/loss, at least for the fact that I can see this in my driveway:


Title should arrive within next two days, then my relationship with this car can really begin. If the nice weather we've been having keeps up, I might have to treat myself to a drive.

Wednesday, December 21, 2011

Fuel Pump, Fuel Filter, Carburetor and MORE

The last couple days were spent in cramped uncomfortable positions, trying to get this puppy running. First thing first, I took the old fuel pump off, cut the wires, and went across the street to Autozone and picked up a new pump. I also picked up an inline fuel filter. For some reason, this car didn't have one previously. I'm planning on running high quality fuel in the car, but in case there are any leftover gremlins hanging out at the bottom of the gas tank, I want to play it safe. I also want to treat any new engine components down the road with utmost care, particularly the Weber carb I plan on installing.

Here's the new pump on the left next to the old one. The fuel filter is clear plastic but will eventually need to be replaced down the line with a metal one due to proximity to the road. I want to see how the tank is doing for a while though.

The previous owner had already done all the hard work of drilling holes and wiring things in, so putting the pump in was just a matter of connecting hoses and trying not to spill gas everywhere. I need to clean the wiring system in this car up a bit too. Since there is body work and paint that needs to be done, I plan on doing a total rebuild next winter. For now though I am focusing on mainly mechanical/electrical issues.


Up and running after everything was put back together. Those fins under the turn signals are diamond plate steel bolted to the frame. I'm not sure what their purpose is besides providing me with a tetanus threat everytime I need to get under the frame. I plan on fabricating a bumper for it soon, but I will attach it to the two main points underneath the grille.

Once again thanks to Brock Murphy @ European Motorworks for letting me use his shop and some more specialized tools. He is really a knowledgeable guy that will help you get the job done right.


 This afternoon saw a quick adjustment of the carb to idle more smoothly, and a quick drive around the block to see if it the motor is running smoothly.  Unfortunately, it stalled out on me, and refused to start back up, so I had to push it the rest of the way back. Thanks to the two guys that stopped to help me. When I got back to the shop to diagnose the problem,  I was denied access to the engine bay. The cable to pop the hood is jammed somewhere along the line. I tried to mess with it from the inside, but with no luck. I think it is being pinned down by the battery which is unsecured at the moment. Every attempt to force pop the hood so far has been brutally unsuccessful. To top it off, I snapped the spring off from the pivot plate that releases the hood. Sorry for the lack of pictures here but I was racing the quickly fading solstice sun and the cold winds were starting to blow. 

Spending tomorrow going to Phoenix and brainstorming, but come Friday, I will try my luck once again. Going to have a conundrum on my hands if I don't get this figured out. Slowly but surely, this car will teach me its lessons.

Monday, December 19, 2011

FIRST DAY

12-19-11


I took delivery of my 1973 Toyota Corolla TE-27 two days ago. Today was the first day of working on her. First step was to "clean out the cobwebs" and get her idling properly. When I took her off the trailer, she was not wanting to start up. The seller I bought her from said he had the carburetor rebuilt, but he obviously didn't run it recently, as the old gas in the tank was trash. As you can see, we (myself and my trusty Flagstaff car guy- Brock Murphy w/ European Motor Company) made quite a smoky mess trying to clean the old gas out before putting new 91 octane in. The old gas was so bad, the fumes burnt the concrete, as you can see below.


Somewhere in this process, the fuel pump stopped working. We could hear it when the key was turned in the ignition, but then it suddenly stopped working. We tried running some Sea foam cleaner through the carburetor, and the engine would turn over with this poured in, but would then stall due to a lack of fuel. Time to check out the pump.

We jacked up the back of the car (looked kind of funny), and found the pump. It was a newer aftermarket pump, so I assumed it was still in good operating condition. I did however, find something I didn't like. The wires connected to the fuel pump were just spliced together and wrapped in electrical tape. Kids, THIS IS NOT PROPER. Time to check the leads for voltage.

The wires were giving 11 volts with ignition turned, so we surmised the fuel pump must be faulty. Unfortunately, at this point there was still a couple gallons of really nasty gas in the tank, so we used our good friend gravity to get the rest of the gas out.

Tomorrow morning, I'm going to pick up a new fuel pump, install it properly, and also throw an inline fuel filter just so I feel extra secure about it.

After that, gonna go register it, and get to drive it around town a little bit :)